Tag Archives: Recipe

Wednesday Weekly Blogging Challenge: The Best Dish I Cook (and Recipe)

Hosted by Long and Short Reviews.

Click here to read everyone else’s replies to this week’s question and here to see the full list of topics for the year.

A plate filled with pasta, shrimp, and cooked tomatoes.The best dish I cook is Lemon Shrimp Scampi.

This is a stock photo of a similar shrimp pasta dish. I included it because it features cooked tomatoes as well which can be a nice addition to this meal if you need more vegetables in your diet.

Ingredients

  • 1 pound uncooked shrimp (26-30 per pound)
  • 8 ounces uncooked angel hair pasta (I use whole wheat, but white works just as well)
  • 1 tablespoon butter
  • 1 tablespoon olive oil
  • 2 green onions, thinly sliced
  • 4 minced garlic cloves
  • 1/2 cup chicken broth
  • 2 teaspoons grated lemon zest
  • 3 tablespoons lemon juice
  • 1/2 teaspoon freshly ground pepper
  • 1/4 teaspoon salt
  • 1/4 teaspoon crushed red pepper flakes
  • 1/4 cup minced fresh parsley
  • Grated Parmesan cheese (optional)
  • Small tomatoes, washed and cut in pieces (optional)

Instructions:


  • Begin to boil water and cook pasta. Cook and drain it as necessary while you work on the other steps.
  • If needed, peel and devein the shrimp. Remove their tails and cut them in half lengthwise. I generally buy deveined shrimp to simplify this step.
  • Heat butter and oil over medium-high heat in a large skillet. Add shrimp, green onions and garlic. Cook and stir for 2-3 minutes until shrimp turn pink. Add the tomatoes in at this point, too, if you want them. Remove the shrimp from pan with a slotted spoon. The tomatoes can stay in to finish cooking.
  • Add broth, lemon zest, lemon juice, pepper, salt and red pepper flakes to that same pan. Bring it to a gentle boil and cook until liquid is slightly reduced. This should take about 1 minute. Return the shrimp to the pan and remove from heat.
  • Drain pasta and divide it among 4 bowls. Top with shrimp mixture; sprinkle with parsley and, if desired, the cheese.

Serves 4.

This is an especially nice thing to make on a warm day when regular pasta might feel too heavy.

14 Comments

Filed under Blog Hops

A Pumpkin Chocolate Chip Cake Recipe for Halloween and Thanksgiving

A slice of pumpkin chocolate chip cake on a black and white side plate

I’m veering a little off-topic today and sharing one of my favourite autumn recipes.This is something I found on a vegan blog many years ago. If that site still existed, I’d link to it and give credit.

Not only is this cake dairy-free, it can be soy, egg, and nut-free as well as long as you select allergen-safe chocolate chips for it.

This means that it can be shared with many different types of people who are often otherwise left out of the dessert festivities during Thanksgiving, Halloween, and other holidays.

And who doesn’t love inclusive desserts?


Ingredients

Cupcakes (double these measurements for a cake)

1 cup pumpkin puree
1/3 cup oil
1 cup sugar
1/4 cup non-dairy milk
1 tsp vanilla extract
1 1/4 cups flour (all purpose)
1/2 tsp baking powder
1/2 tsp baking soda
1/2 tsp cinnamon
1/4 tsp salt
1/2 cup chocolate chips

Cinnamon Icing (Optional)

1/2 cup confectioners sugar
1/2 tsp cinnamon
2 Tbsp melted vegan margarine (or similar oil/fat substitute)
1 Tbsp non dairy milk
1/2 tsp vanilla extract

Directions

A pumpkin chocolate chip cupcake on a decorative side plate

Preheat oven to 350 F.

In a bowl, stir the first 5 ingredients. Then sift the flour, baking powder, baking soda, salt and cinnamon together in a second bowl. Stir with a fork as using a hand mixer will make the batter gummy. Once combined, fold in chocolate chips.

Fill cupcake liners 2/3 full (if making cupcakes) and bake for 22-24 minutes or until a toothpick pushed into the middle of one of them comes out clean.

If you’re making a cake, lightly grease an 11×7 baking pan, pour it in, and bake it while using the same toothpick trick to see when it’s done. This takes about 30-35 minutes in my oven.

Cool completely before icing them.

To make the icing, stir all of those ingredients together gently. The icing will naturally be a bit runny, so you really don’t want to be using it on a warm cake that will only make it runnier.

Like I said before, double this recipe for a cake.

Yes, you can use any sort of oil you have on hand. I recommend using white flour for it, but do let me know how it is with whole wheat pastry flour if you decide to go that route.

The pumpkin puree makes this cake quite moist and dense. The sugar and chocolate chips create a pretty sweet treat, so I generally skip the icing altogether.

This cake freezes well. Let it thaw gently at room temperature for a few hours or until it’s soft all the way through.

My local grocery store sells chocolate chips that are free of the top eight allergens, including milk, soy, eggs, and nuts. If you can’t find something similar at your local grocery store, check any health food stores that might be nearby. You could also order them online in many areas if you plan ahead a little.

Enjoy!

8 Comments

Filed under Personal Life

Wednesday Weekly Blogging Challenge: Favorite Food and How I Use (+ Recipe)

Hosted by Long and Short Reviews.

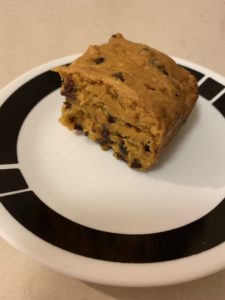
Fellow participants, I have one word for you: strawberries.

They’re in season in June and July here in southern Ontario. My grandmother serves strawberries, milk, and sugar to relatives as a light supper on hot days when no one is that hungry and she doesn’t want to heat up the kitchen.

Most of the time, I slice them up and eat them plain. They’re so sweet and juicy that they really don’t need the extra sugar in my opinion.

Occasionally, though, I make my family’s shortcake recipe and eat it with almond milk and sliced strawberries.

This is a pretty forgiving recipe. You can use half the sugar if you’re serving it someone who needs to watch their sugar intake. It works well with many different combinations of flour, fats, and types of milk, too, so feel free to play around with it if you need to avoid certain ingredients for whatever reason.

I should warn you that the shortcake this recipe makes is denser than what you might find in the store, though. Think something heavier, not a fluffy baked good like angel food cake. It’s made that way on purpose so that the shortcake will soak up all of the milk you’re about to pour on it and gradually crumble into cold, soup-y deliciousness as you reach the bottom of the bowl.

Strawberry Shortcake

Ingredients:

2 1/2 cups of flour (i generally use half whole wheat and half white, but 100% white flour works well, too)
2 teaspoons baking powder
1/2 teaspoon salt

2 eggs
1 cup sugar
1 cup milk  (soy or rice milk works well, too)
2 tablespoons butter (oil or margarine works well, too)
1 teaspoon vanilla

Toppings:

Sliced strawberries
Whipped cream
Table sugar
Milk

Directions:

Stir the three dry ingredients in a large bowl.

Beat eggs, milk, vanilla, and melted butter together in a separate bowl.

Combine the wet and dry ingredients together. Mix everything until it’s moist, but be careful not to overmix it. The batter might look a little lumpy. That’s okay.

Pour the batter into a greased 8 or 9 inch cake pan. A square 8×8 pan also works fine for this recipe.

Bake at 375 Fahrenheit for 25-30 minutes. You’ll know it’s finished when you can stick a butter knife or toothpick into the shortbread and have it come out again without any batter sticking to it.

Serving Size and Presentation

This will make about nine servings of shortbread depending on the size of your pan.

Serve with sliced strawberries, a sprinkling of table sugar, a little bit of milk, and (optional) whipped cream.

I nearly always choose strawberries for this dessert because I love them so much, but this also works nicely with other types of berries if anyone reading this dislikes or is allergic to strawberries. Like I said before, there is plenty of flexibility in this recipe. That’s one of the reasons why I enjoy it so much!

Click here to read everyone else’s replies to this week’s question. The image below is the list of upcoming prompts for this blog hop.

20 Comments

Filed under Blog Hops

Wednesday Weekly Blogging Challenge: Comfort Foods and Recipes and Whys, Oh My!

Hosted by Long and Short Reviews.

This week’s topic is “Favourite Comfort Foods & Why (& Recipes),” so of course I just had to play around with the wording of it a little in the title of this post in order to sneak in a reference to The Wizard of Oz. I will now proceed to answer the prompt (mostly) seriously.

Both of my parents grew up in the Mennonite community and have the same general ethnic origins: German and French.

In fact, all of the ancestors we’ve traced so far came from the Alsace-Lorraine area that was sometimes part of Germany and sometimes part of France depending on which century you’re looking at.

If your ancestors ever so much as glanced at that corner of the globe, we are probably third cousins or something.  Ha!

All of the recipes I’m about to share were either printed in the Mennonite Community Cookbook that I’ve attached a photo of to this post or written on the blank pages of that cookbook.

To the best of my knowledge, they are all traditional German-Mennonite dishes for people from that group who live in Midwest portions of the United States.


This is what ground cherries look like. Photo credit: Pen Waggener.

Ground Cherry Pie 

If you happen to live in North America, your best best for finding ground cherries would be at your local farmer’s market during the summer or autumn. They’re a tomato-like fruit that’s less sweet than most other fruits. I sure think they taste good in a pie.

My grandmother makes this pie often. I think happy thoughts about her every time I eat it.

Ingredients

  • 2 cups water
  • 1 cup of ground cherries (rinsed off and with their husks removed)
  • 1 cup sugar
  • 2 tablespoons mini tapioca
  • 2 tablespoons vinegar
  • Yellow food colouring (as much as desired)
  • A pie shell

Directions

Begin by boiling the water. Add the rest of the ingredients one at a time, and allow the water to go back up to a boil before adding the next ingredient.

After you’ve added as much food colouring as desired, pour the mixture into a pie shell. Add the top crust (if desired), and then bake your pie at 400 F for 15 minutes. Then turn the temperature down to 350 F and bake for another thirty minutes. It should have a consistency similar to other fruit pies when it’s finished. Serves 6-8.

Kartoffle Kloesse (Potato Dumplings)

I don’t have a picture of this recipe, but it’s something one of my grandmothers used to make. It’s delicious.

Ingredients

  • 6 boiled potatoes
  • 2 eggs
  • a little salt
  • 1/2 cup flour
  • Croutons

Directions

Grate 6 boiled potatoes . Add eggs, salt, and flour. Beat this mixture until fluffy. Roll it into balls with 2-3 croutons in the centre of each ball. Dump the balls into gently boiling salted water for 10 minutes. Drain well and serve. A little sour cream on the side of your plate would do wonders with this dish if you’re so inclined.

Photo credit: Windell Oskay.

Soft Pretzels

I strangely couldn’t find any of the photos I’ve taken of my own soft pretzels over the years, so I grabbed one off the Internet. You could even make them in fancy ampersand shapes if you wanted to!

Ingredients

  • 4 teaspoons active dry yeast
  • 1 teaspoon white sugar
  • 1 1/4 cups warm water (110 degrees F/45 degrees C)
  • 5 cups all-purpose flour
  • 1/2 cup white sugar
  • 1 1/2 teaspoons salt
  • 1 tablespoon vegetable oil
  • 1/2 cup baking soda
  • 4 cups hot water
  • 1/4 cup kosher salt, for topping

Directions

In a small bowl, dissolve yeast and 1 teaspoon sugar in 1 1/4 cup warm water. Let stand until creamy, about 10 minutes.

In a large bowl, mix together all of the ingredients except the flour.

Add in the flour one cup at a time. You might need as few as three cups of it.

Mix and form into a dough. If the mixture is dry, add one or two more tablespoons of water. Knead the dough until smooth, about 7 to 8 minutes. Lightly oil a large bowl, place the dough in the bowl, and turn to coat with oil. Cover with plastic wrap and let rise in a warm place until doubled in size, about 1 hour.

Preheat oven to 450 degrees F (230 degrees C). Grease 2 baking sheets.

In a large bowl, dissolve baking soda in 4 cups hot water; set aside. When risen, turn dough out onto a lightly floured surface and divide into 12 equal pieces. Roll each piece into a rope and twist into a pretzel shape. Once all of the dough is shaped, dip each pretzel into the baking soda-hot water solution and place pretzels on baking sheets. Sprinkle with kosher salt.

Bake in preheated oven until browned, about 8 minutes. Serves 12.


Bonus Recipe – Dandelion Salad

 I found this recipe in the cookbook mentioned above, and I know have ancestors who ate whatever they could find when food/money was scarce based on certain family legends. To be fair, that hasn’t happened in a few generations so this doesn’t quite count as a comfort meal.  I’d like to try it someday, though! Have any of you ever eaten dandelions or other wild greens?

Salad Ingredients

  • 4 cups chopped dandelion
  • 3 hard-cooked eggs
  • 3 slices bacon

Dressing

  • 1.5 tablespoons flour
  • 1 teaspoon salt
  • 1 egg
  • 2 tablespoons sugar
  • 1/4 cup vinegar
  • 2 cups milk or water

Directions

Wash and chop dandelions

Cut bacon into pieces and fry until crisp

Remove bacon from drippings

To make dressing, stir together the dry ingredients, add egg, vinegar, and water. Stir until well blended.

Cook dandelions in bacon drippings until thickened and cool slightly.

Pour dressing over dandelions and mix lightly. Garnish with sliced or chopped eggs and the crips bacon. Serves 6.

Click here to read everyone else’s replies to this week’s question. The image below is the list of upcoming prompts for this blog hop.

19 Comments

Filed under Blog Hops, Personal Life

Adventures in Making Lembas Bread

Have you ever read a book that described fictional foods you desperately wished you could try? I blogged about this topic in detail a few months ago. Recently, I decided to finally try the closest thing to real Lembas bread that exists on our planet since the elves left Middle-earth at the end of The Lord of the Rings.

Not only is this recipe simple, it uses ingredients that are very common. You might have all of them in your kitchen already!  Not having to shop for obscure ingredients that I probably won’t use in any other dishes was one of the main reasons why I chose this particular recipe to try. I bake pretty infrequently (as you’ll hear about below), so I generally only buy seasonings, spices, and other things that I can use in multiple ways in the kitchen.

I’m copying over the ingredients and instructions into this post so that they’ll still exist somewhere if the site I linked to above ever goes down. Do click on over for the nutrition information and for a gorgeous picture of the final product, though.

If you want to know my detailed thoughts on making this recipe and how I’d change it in the future, keep reading.

Ingredients

    • 2 1/2 cups of flour
    • 1 tablespoon of baking powder
    • 1/4 teaspoon of salt
    • 8 tablespoons (or 1 stick) of cold butter
    • 1/3 cup of brown sugar
    • 1 teaspoon of cinnamon
    • 1/2 teaspoon maple syrup or honey
    • 2/3 cup of milk or heavy cream (or more, if necessary)
    • 1/2 teaspoon of vanilla


Directions

1) Preheat oven to 220 degrees Celcius (425 degrees Fahrenheit).
2) Mix the flour, baking powder and salt into a large bowl.
3) Add the butter and mix with a fork or a pastry cutter until the mixture resembles fine granules.
4) Add the sugar and cinnamon, and mix them thoroughly into the mixture.
5) Add the milk/cream and vanilla and stir them in with a fork until a nice, thick dough forms.
6) Roll the dough out about 1/2 in thickness.
7) Cut out 3-inch squares and transfer the dough to a cookie sheet.
8) Criss-cross (DO NOT cut all the way) each square from corner-to-corner with a knife.
9) Bake for about 12 minutes or more (depending on the thickness of the bread) until it is set and lightly golden.(the recipe makes about 10-12 pieces of lembas)

The first time I try any recipe, the only substitutions I make are to replace any milk and milk products in it with foods that won’t cause any allergic reactions for me. It’s important to know what something is supposed to taste like before you fiddle around with the ingredients too much.

I used vegan butter instead of traditional butter and almond milk as a replacement for the milk/heavy cream. If you consume dairy products, I’d love to know how this turns out with them.

The dough did feel slightly dry when I was rolling it out. That made it a little challenging to keep the dough together when I was cutting it into pieces. When I make this recipe again, I’d like to see how it turns out with a full cup of almond milk. I suspect that will be just enough additional liquid to solve the minor issues I had with getting the dough ready to be baked.

As I mentioned above, I don’t regularly bake stuff like bread or sweets. My supply of brown sugar had dried out, and I didn’t know that was the case until I’d reached that section of the directions. It was slightly challenging to mix that ingredient into the dough thoroughly. The little brown speck you see in the final product was a result of that.

Next time I’ll use fresh brown sugar and won’t have that problem. Raisins might be a nice addition to it as well. Despite my minor problems with the dough, the final product tasted delicious. It is definitely something I’ll be making again.

I know that my tastebuds have changed since I started eating a low sugar diet, but the combination of cinnamon, maple syrup, vanilla, and brown sugar made me think of it as a dessert.

Keep in mind that this isn’t as sweet as a typical dessert, but it does have a sweetness and chewiness to it that made it an appealing snack.

The Lembas bread I made two days ago has been keeping well so far. It honestly tastes even better after it’s had a day or two to rest. I love non-fussy recipes like that.

As for whether or not it will sustain you on a long journey or vex the Smeagols in your life, only time will tell. 😉

2 Comments

Filed under Personal Life

The Tale of the Coveted Cookies

No, this is not the beginning of a fairy tale. It really happened years ago when I was a teenager, and I thought it would be an amusing story to share with you as the holiday season ramps up.

My mom comes from a fairly large extended family. Both of her parents had many siblings, so both sides of her family tree used to have large potluck dinners every December to give everyone a chance to spend time together over the holidays.

 My maternal grandmother’s side of the family included a White Elephant gift exchange in their gigantic Christmas get-together. Every family unit – which was roughly defined as a couple (or single person) and any children under the age of 20 they may have – was asked to bring one wrapped gift that would appeal to an adult of any age.

One year, mom had no idea what to bring for the gift exchange. What she did have was a little extra time on her hands and an empty decorated tin from a previous Christmas. She whipped up a quick batch of chocolate chip cookies and put as many of them as would fit into the tin. It was such a pretty box that she didn’t bother wrapping it in festive paper.

In a white elephant gift exchange, a member from each family is allowed to choose one wrapped present. Everyone then sat in a semicircle of chairs. One by one, they opened their gift and then decided whether they wanted to keep it or trade it for one of the other opened presents.

This was a decision that could be made only once. After your turn ended, you’d either hold onto your gift for good or have it “stolen” by someone further down the line who preferred it to whatever it was they had unwrapped.

When mom’s gift was opened by a cousin, he grinned. The next person to open their gift quickly “stole” the cookies from the first person.

This happened a few different times throughout the course of the game. I don’t remember who finally ended up with them, but it was funny to see adults become so playfully competitive over a tin of cookies. (Granted, they were delicious cookies!)

While I haven’t participated in a gift exchange in many years, I think of this story every December.

Sometimes the best gifts really are the simplest ones.

If you’d like to make these cookies for yourself, here is the recipe. It’s every bit as delicious as it sounds, and the cookies are quite easy to make as well.

Chocolate Chip Cookies

1 1/3 cups Crisco (or margarine)
2 cups sugar
1 cup brown sugar
4 eggs
2 teaspoon baking soda
2 teaspoons salt
4 teaspoons vanilla
4 1/2 cups flour
1 package chocolate chips (about 340 grams or 12 ounces)

Directions

Mix the Crisco, sugar, brown sugar, and eggs  together until fluffy.
Add the baking soda, salt, and vanilla. Mix well.
Add the flour in one cup at a time. Mix well.
Stir in the chocolate chips.

Spoon the dough onto lightly greased cookie sheets.

Bake at 350 Fahrenheit for 6-7 minutes or until golden brown.

Makes about 6 dozen cookies.

Comments Off on The Tale of the Coveted Cookies

Filed under Personal Life